It is commonplace on Magento ecommerce sites for products to be added under more than one category, or for categories to be added within different areas of the site. Adding products under multiple relevant categories or categories within different areas of the site makes perfect sense, as it increases visibility, but it can confuse Google and harm your rankings.
The good news is that canonical tags can be added to pages to tell Google which is the preferred page that you want to rank for. Configuring Magento canonical tags is important as it will combat duplicate content your website(s). In this post, I take a look at how to add canonical tags in Magento, one of the most commonly used website ecommerce platforms.
Setting up Magento product canonical tags
Within Magento you can set up canonical tags for product pages so that the URL you would like to rank is always the URL of the product without any of the category paths. For example, by using a canonical tag you could instruct Google that you want to index the page URL highlighted in italics out of the list of pages shown below:
https://www.examplesite.com/tempur-kingsize-mattress.html
https://www.examplesite.com/beds/mattresses/tempur-kingsize-mattress.html
https://www.examplesite.com/beds/mattresses/tempur/tempur-kingsize-mattress.html
To set the canonical tag to default to your product page name, without the categories, complete the following steps:
- Login to Magento and go to the configuration settings
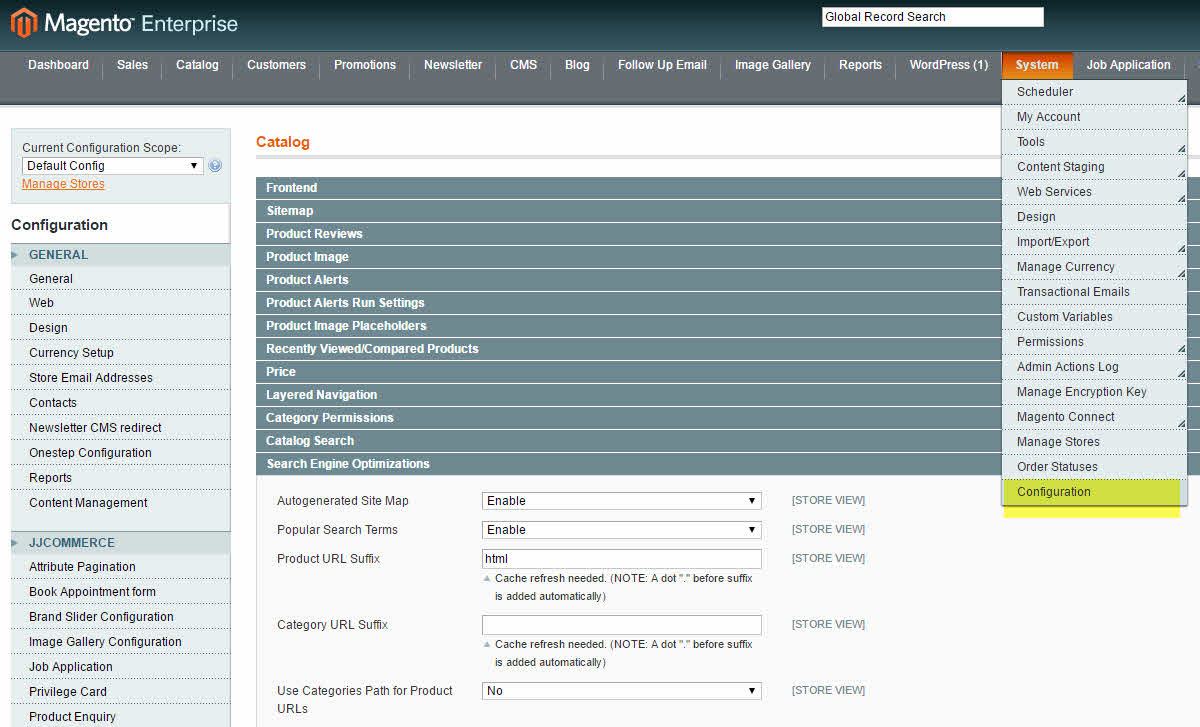
Login to Magento and select the System menu (far right) and select Configuration from the drop down (last option in list).

- Go to the Catalog page
Once you are on the Configuration screen, select the Catalog menu option on the left.
- Go to the Search Engine Optimisations settings
Click on the Search Engine Optimisations heading on the catalogue page.

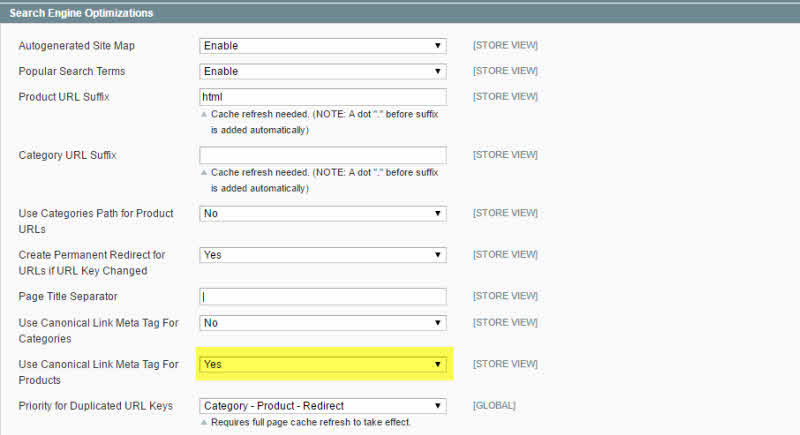
Make sure that the Use Canonical Link Meta Tag for Products and Categories are set to Yes and click save.
It is important that you do not change the Use Canonical Link Tag for Products field to No, if it is already set to yes. Doing so will destroy your SEO as there will be multiple URLs pointing to product pages. Without product page canonical tags Google will not be able to work out which page you want to rank.
How to set up canonical tags in Magento for category pages
Setting up canonical tags for category pages in Magento is not quite as straight forward as it is for products. You can allow Magento to set the category page canonical tags for you, using the Use Canonical Link Meta Tag for Categories drop down option on the Search Engine Optimisation tab on the Catalog page, but this will include self referencing canonical tags. To resolve any competing categories, you will override to override this using the custom code explained below.
Manually setting up and managing canonical tags in Magento
1. Select the category page that you want to add a canonical tag to
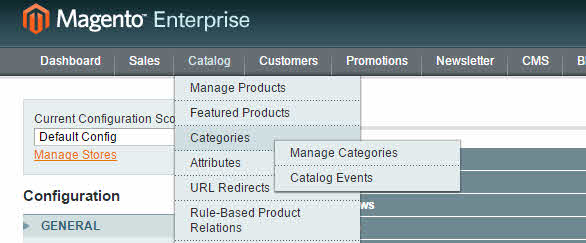
To add a canonical tag to a Magento category page, go to the category page that you would like to add the tag to. To do this, Select Catalog from the menu and click on Manage Categories.

2. Select the custom design tab
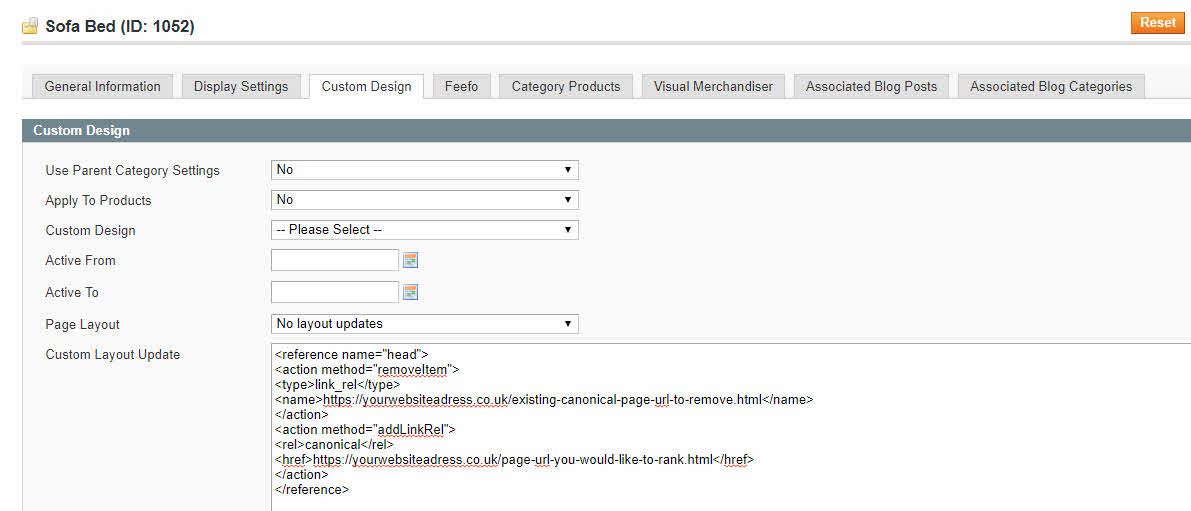
Select a category and then click on the Custom Design Tab.
4. Go to the Custom Design Custom Layout Update box
Navigate to the Custom Design, Custom Layout Update box on your category page.

In the Custom Layout Update box add the code below to remove the current self referencing canonical tag. Enter the URL that you would like to remove within the area highlighted in bold below.
<reference name=”head”>
<action method=”removeItem”>
<type>link_rel</type>
<name>https://yourwebsiteadress.co.uk/existing-cannonical-page-url-to-remove.html</name>
</action>
The next bit of code is where you specify the canonical tag that you would like to add to the category page. Enter your URL in the area marked in bold to the page to point to the category page on your site that you do want Google to Rank.
<action method=”addLinkRel”>
<rel>canonical</rel>
<href>https://yourwebsiteadress.co.uk/page-url-you-would-like-to-rank.html</href>
</action>
</reference>
Essentially, your completed code should resemble the following example code:
<reference name=”head”>
<action method=”removeItem”>
<type>link_rel</type>
<name>https://yourwebsiteadress.co.uk/existing-canonical-page-url-to-remove.html</name>
</action>
<action method=”addLinkRel”>
<rel>canonical</rel>
<href>https://yourwebsiteadress.co.uk/page-url-you-would-like-to-rank.html</href>
</action>
</reference>
Click Save Category and then view the source code to check the code looks correct. You should see the following code in the source code of you category page.
<link rel=”canonical” href=”http://yourwebsiteadress.co.uk/page-url-you-would-like-to-rank.html” />
Alternatively if you are getting an XML error when trying to save, you will need to replace the quotation marks used within the code as manually as copying them from this web may change them to non xml compliant code.
Conclusion
The advantage of manually setting canonical tags in Magento, is that you can now successfully manage duplicate categories on your website. The downside is that if you have many duplicate categories it may take you a while to set this up on every category page.
I do recommend that you invest the time and effort to deal with duplicate categories in this way as the benefits are worthwhile, as you should see an improvement in the organic performance of your site.
